If you’ve ever launched your Android build, pulled up logcat and stared at a “not initialized” error from ByteBrew — you know the feeling. The game runs fine in the Unity Editor. Events fire, everything looks good. Then you sideload the APK and nothing shows up on the dashboard. The root cause almost always comes down to a handful of Android-specific integration issues: the External Dependency Manager not being resolved, ProGuard stripping ByteBrew classes in release builds or the SDK being called before it’s actually ready. None of these are obvious from the Editor. All of them are fixable in under ten minutes once you know where to look.
What ByteBrew Actually Does (Quick Context)
ByteBrew is a lightweight SDK for mobile game analytics — real-time custom events, IAP validation, remote configs, A/B tests, push notifications. The Unity wrapper handles most of the native Android work internally, so you don’t need to touch Java or Gradle directly. But Android builds are picky. Dependency resolution, build settings, ProGuard/R8 and initialization order all matter and getting any one of them wrong is enough to silently break the whole thing.
Step-by-Step Integration (Android-Specific)
1. Import the SDK and Run the Dependency Resolver
Download the latest .unitypackage from the official GitHub repo and import it into your project.
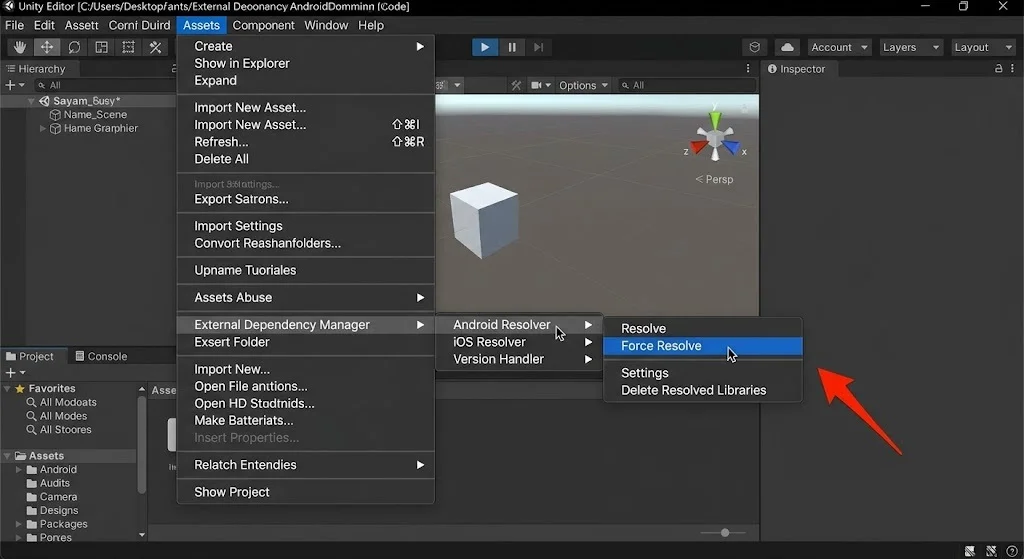
Here’s the Android-specific step that trips up most people: after importing, go to Assets → External Dependency Manager → Android Resolver → Force Resolve.
This pulls in the Google libraries ByteBrew needs — things like play-services-ads-identifier, Firebase Messaging and Install Referrer. Skip this step and you’re almost guaranteed to hit NoClassDefFoundError or ClassNotFoundException at runtime. The SDK looks fine in the Editor. The APK falls apart.
If Auto-Resolve is enabled, this may run automatically — but run it manually anyway to be sure.
You can also add these two lines to Assets/Plugins/Android/gradleTemplate.properties if you’re seeing AndroidX/Jetifier conflicts:
android.useAndroidX=true
android.enableJetifier=true
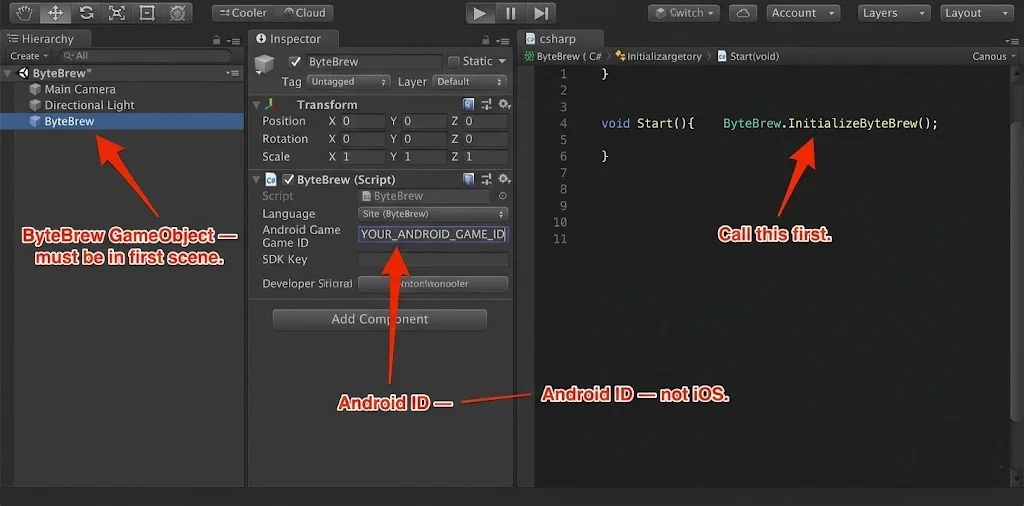
2. Create the ByteBrew GameObject in Your First Scene
Go to Window → ByteBrew → Create ByteBrew GameObject and place it in your very first scene. Not the second one. Not a scene that loads dynamically later. The first one. If it isn’t there from the start, the SDK never initializes.
3. Enter the Right Keys — Android and iOS Are Separate
Open Window → ByteBrew → Select ByteBrew settings, enable Android and paste in your Android Game ID and SDK Key from the ByteBrew dashboard (under Game Settings).
The dashboard creates separate Game IDs for Android and iOS. Using the iOS key on an Android build is a surprisingly common mistake and it prevents initialization entirely with no obvious error.
4. Call InitializeByteBrew() Early
using ByteBrewSDK;
void Start()
{
ByteBrew.InitializeByteBrew();
ByteBrewAds.InitializeAds(); // Only if using ads
}
Put this in Awake() or Start() of a script in your first scene. The earlier the better. Don’t call any other ByteBrew methods — custom events, remote configs — in the same frame or before checking that initialization actually completed.
5. Gate Everything Behind IsByteBrewInitialized()
Newer SDK versions expose a readiness check:
if (ByteBrew.IsByteBrewInitialized())
{
// Safe to log events, fetch remote configs, etc.
}
Use this — or a coroutine that polls it — as your initialization callback. Events fired before this returns true often fail silently and never appear on the dashboard.
The Three Causes Behind 90% of Cases
Let’s be direct about what actually goes wrong. Most “not initialized” errors trace back to one of these three things.
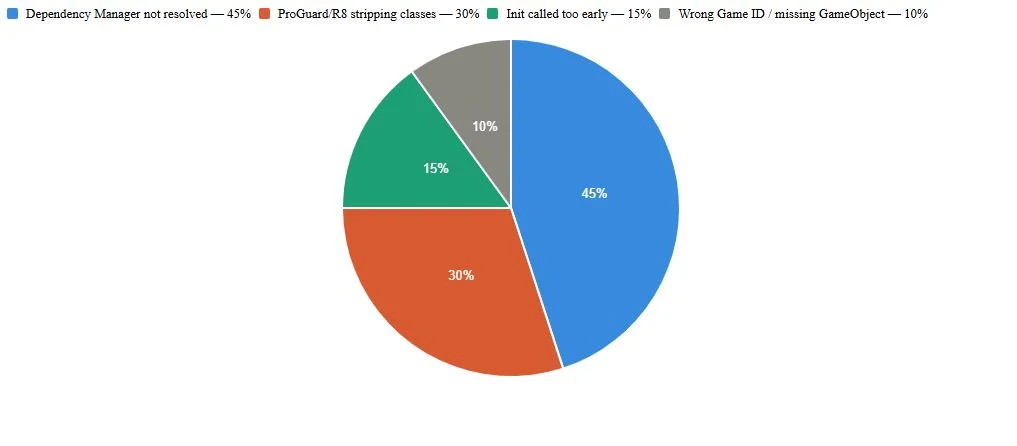
The chart above reflects frequency based on the official docs, GitHub changelogs and patterns seen across similar Unity SDK integrations (Firebase, Adjust, AppsFlyer all hit the same three problems).
Problem 1: External Dependency Manager Not Resolved
Already covered in step 1 — but worth repeating because it’s the most common cause by a wide margin. The Editor doesn’t need those Google libraries. The Android build absolutely does.
Run Force Resolve every time you import or update the SDK.
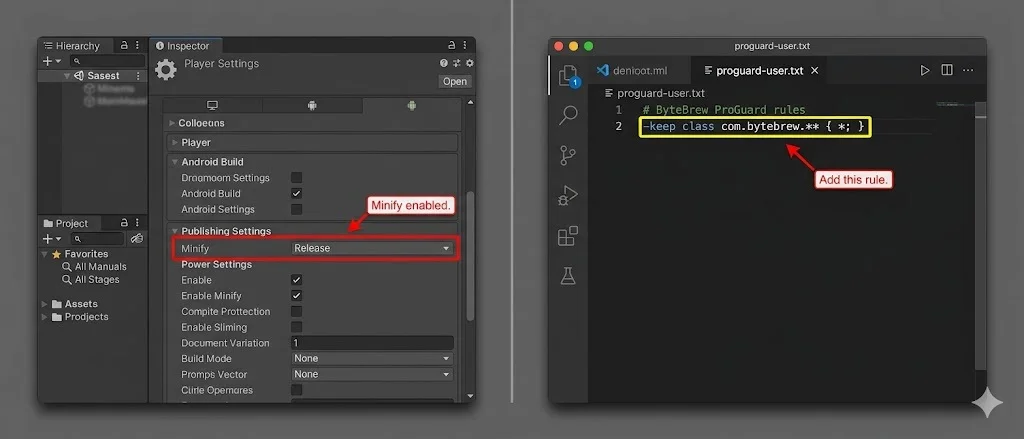
Problem 2: ProGuard / R8 Stripping ByteBrew in Release Builds
This one only shows up in release builds, which makes it easy to miss. If you have Minify enabled in Player Settings → Publishing Settings, R8 may strip ByteBrew’s classes because it doesn’t see them being called directly.
Fix: create or edit proguard-user.txt (Unity auto-includes this in the build) and add:
-keep class com.bytebrew.** { *; }
The official docs call this out explicitly. Don’t skip it if you’re doing release builds.
Problem 3: ByteBrew Called Before It’s Ready
Calling NewCustomEvent() or GetRemoteConfigValue() in the same scene as InitializeByteBrew() — sometimes even in the same Start() method — often produces silent failures. The SDK is still doing async setup work when you try to use it.
Gate downstream calls behind IsByteBrewInitialized() or wait a frame with a coroutine. It takes two extra lines of code and saves a lot of head-scratching.
Common Mistakes vs Correct Fixes
| What Goes Wrong | What To Do Instead |
| Skipping External Dependency Manager after import | Run Assets → EDM → Android Resolver → Force Resolve every time |
| Using iOS Game ID in Android build settings | Check the ByteBrew dashboard — Android and iOS IDs are separate |
| Minify enabled but no ProGuard rule for ByteBrew | Add -keep class com.bytebrew.** { *; } to proguard-user.txt |
| Calling custom events in the same frame as Init | Check IsByteBrewInitialized() before any downstream calls |
| ByteBrew GameObject placed in scene 2 or later | Move it to the very first scene in your build order |
| Updating SDK without deleting old files first | Delete /Assets/ByteBrewSDK entirely, then re-import and re-enter keys |
Quick Checklist Before You Build
| Step | Done? |
| Downloaded latest SDK (0.2.x) from GitHub | ☐ |
| Ran Force Resolve in External Dependency Manager | ☐ |
| ByteBrew GameObject placed in first scene | ☐ |
| Android enabled in ByteBrew settings (not iOS) | ☐ |
| Correct Android Game ID and SDK Key entered | ☐ |
| InitializeByteBrew() called in Awake() or Start() | ☐ |
| Downstream calls gated behind IsByteBrewInitialized() | ☐ |
| ProGuard rule added if Minify is enabled | ☐ |
| AndroidX and Jetifier enabled in gradleTemplate.properties | ☐ |
| Sessions and events visible on ByteBrew dashboard after test build | ☐ |
How to Debug on Device
If you’ve gone through the checklist and still see nothing on the dashboard, run a real device test with logcat:
adb logcat | grep -E “ByteBrew|bytebrew|Unity”
Look for:
- NoClassDefFoundError → EDM wasn’t resolved properly.
- ClassNotFoundException → Same or ProGuard stripped something.
- An explicit “not initialized” log → Check init order and IsByteBrewInitialized().
Test in the Unity Editor first for a baseline — newer SDK versions skip Android initialization in the Editor by design, so don’t panic if you see nothing there. The real test is the APK on a physical device.
Sessions and events should show up on the ByteBrew dashboard within a few minutes of a successful init. If they don’t appear after five minutes, the initialization genuinely failed — go back to logcat.
Updating the SDK Without Breaking Everything
Always do this in order:
- Delete the entire Assets/ByteBrewSDK folder
- Re-import the new .unitypackage
- Run Force Resolve
- Re-enter your Game IDs and SDK Key in the settings inspector
Older versions (pre-0.1.3) are especially brittle if you try to update by overwriting. The latest release as of 2026 is in the 0.2.x range and includes Unity 6 support alongside several Android-specific fixes. Start fresh every time.
A Few Other Edge Cases Worth Knowing
- Push notifications on Android 13+: Call ByteBrew.StartPushNotifications() only after InitializeByteBrew() and add <uses-permission android:name=”android.permission.POST_NOTIFICATIONS”/> to your manifest. Android 13 requires a runtime permission request — you’ll need to trigger that in code separately.
- Multidex: If your project pulls in a lot of dependencies and you’re hitting the 64k method limit, enable multidex in your Gradle build. ByteBrew itself is lightweight, but the Google libraries it depends on add up.
- IL2CPP vs Mono: Make sure your scripting backend isn’t mixing things up. If you’re switching between Mono for debug builds and IL2CPP for release, test both paths — stripping behavior differs.
- minSdkVersion: ByteBrew supports down to API 19 (Android 4.4) in recent versions, so you’re unlikely to hit a floor issue there.
Still Stuck?
If nothing above resolves it, a few things worth trying:
- Double-check the ByteBrew dashboard — confirm an Android app was actually created under your account, not just iOS
- Share your Unity version, SDK version, whether IL2CPP or Mono is active, whether Minify is on and the relevant logcat output
- The ByteBrew support team is reachable directly from the dashboard and is reportedly responsive for integration questions
The fix is almost always one of the first three items in that pie chart. Dependency resolution, ProGuard or init order. Work through those systematically before assuming something more exotic is going on.