
Most of the time, there is no need to install another app to block websites on Android; you can do it directly in Android settings, such as Private DNS or Google Family Link. For a more hands on approach, third party applications such as BlockSite provide scheduling and password protection as well. If you are a parent looking to block your child’s device, you might want to use one method, if you are looking to cut back on distractions, you may want to use another and if you are a power user and don’t mind getting technical, you may want to use another method.
The Quick Comparison: All Methods at a Glance
Before getting into the how-to, here’s the full picture. Six methods, different trade-offs — pick the one that fits your situation.
| Method | Works Across All Apps? | Needs Extra App? | Best For |
| Private DNS | Yes — system-wide | No | Anyone wanting no-fuss filtering |
| Google Family Link | Yes | Yes (parent’s device) | Parents managing a child’s phone |
| Chrome Safe Browsing | Chrome only | No | Basic threat protection |
| Firefox Extensions | Firefox only | Extension required | Granular, per-site control |
| Hosts File Editing | Yes — system-wide | Requires root | Advanced users |
| Third-Party Blocker Apps | Yes (with VPN layer) | Yes | Scheduling, productivity, focus |
Worth knowing upfront: no method is completely foolproof on it’s own. A determined teenager, for instance, can get around DNS filtering by switching to a different network. Layering two methods — say, Family Link plus Private DNS — covers more ground.
Method 1: Private DNS — The Built-In, No-App Solution
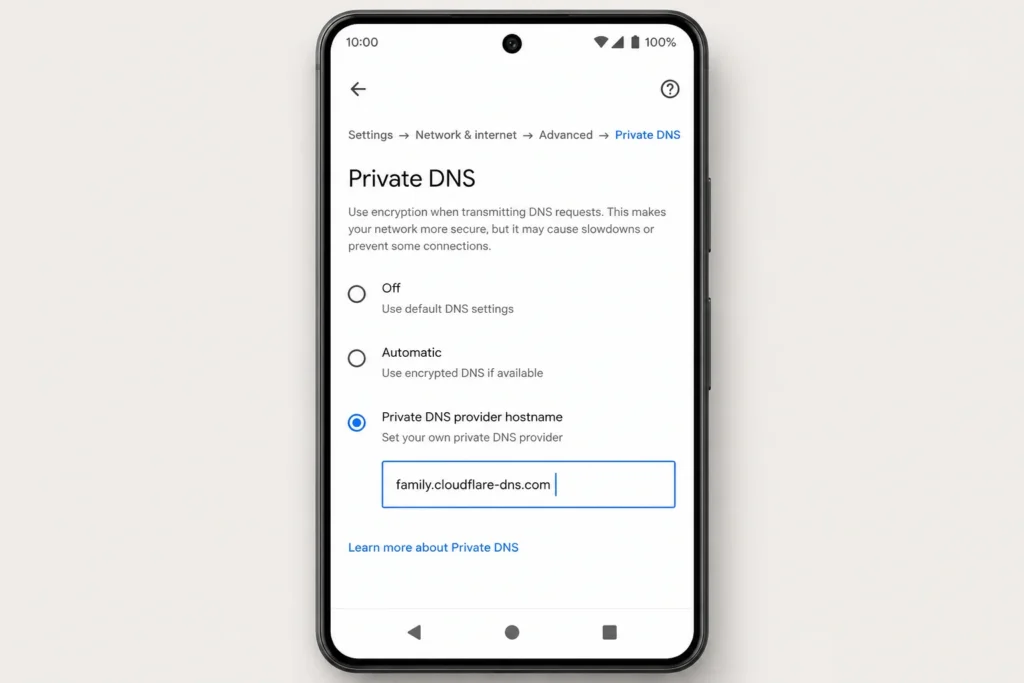
Yes, this one does come as a surprise to many. Private DNS has been available in Android since Android 9 and very few users have used it. It’s in your settings right there and once it’s set up with a family-safe DNS provider, it is blocking content on every app and browser on the device, not just the browser and not just on one website, but on ALL websites.
It’s simple, when you enter a URL in the browser, the phone asks the DNS server “where does this exist?” and is directed there. A family friendly DNS server simply won’t reply to certain classes. It acts as if there aren’t any DNS servers that contain adult content or malware or phishing sites. Also, this does not occur at the application layer, meaning that apps cannot circumvent it as they can a browser add-on.
Steps to set it up:
- Open Settings on your Android phone
- Go to Network & internet → tap Advanced → then Private DNS
- Select Private DNS provider hostname
- Type in one of these — your call:
- family.cloudflare-dns.com — blocks malware and adult content (Cloudflare’s documentation here)
- family.opendns.com — OpenDNS’s family filter
- doh.cleanbrowsing.org — CleanBrowsing, which has a few tiers of filtering
- Hit Save
Done. No app download, no account, no subscription.
One thing to flag: this uses DNS-over-TLS, which means your DNS requests are encrypted too — a bonus privacy win. The catch is that an active VPN on the device can override DNS settings entirely, so if the phone’s running a VPN, this won’t hold.
Who this works best for: Someone who wants system-wide filtering fast, without installing anything or creating accounts. Also a solid first layer if you’re setting up a device for a younger family member.
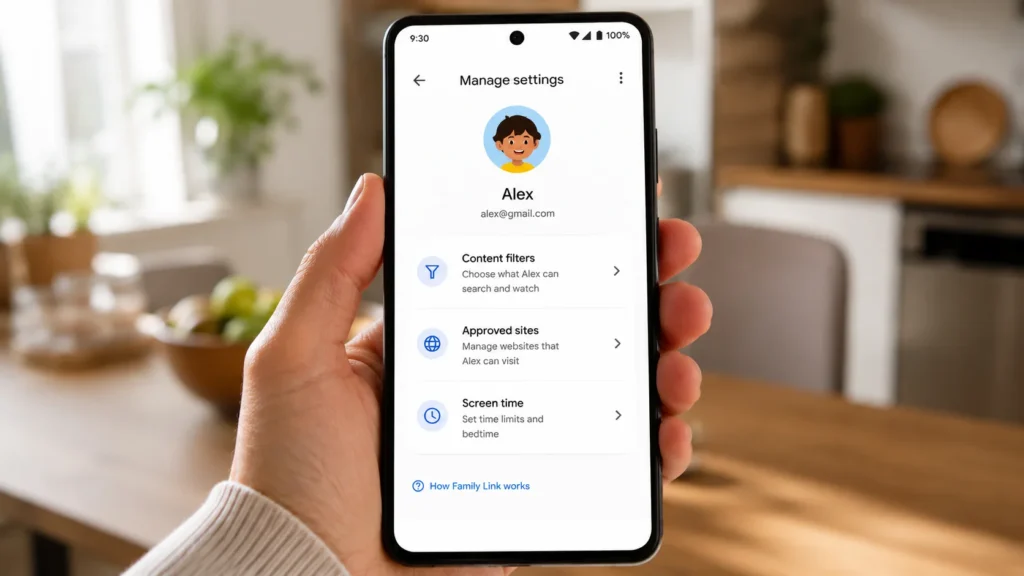
Method 2: Google Family Link and Parental Controls
Family Link is probably the most thorough option if you’re managing a child’s device — not just blocking sites, but actually seeing what’s being browsed, setting screen time limits and approving app downloads. It’s less “block one website” and more “supervise the whole phone.”
The set up involves two devices: your device and the child’s. On the parent’s phone, download the Google Family Link app. From the child’s device, select Settings → Digital Wellbeing & Parental Controls and connect it to the family group. After connection, you can access everything through your mobile device.
What you can actually do once it’s running:
- Block specific sites manually — add any URL to a blocked list.
- Set content filters — age-based filtering that restricts mature content across Google Search and Chrome.
- Approve or reject sites your child tries to visit.
- See browsing history — not in real-time, but close enough.
- Lock the device remotely when it’s past bedtime.
One thing parents sometimes miss: Family Link works best when Chrome is the default browser. If your kid switches to Firefox or a different browser, the content filters may not carry over. Pairing Family Link with the Private DNS method above closes that gap pretty well.
Samsung users — there’s a separate option worth knowing. Samsung Internet (the built-in browser on Galaxy devices) has it’s own parental filter. Go to Samsung Internet → Settings → Parental Controls and toggle on the filter for explicit content. It’s browser-specific, not system-wide, but useful if Samsung Internet is what your family actually uses.
Android 16 is adding something new here too. A dedicated “Supervision” page is coming to the main system settings — making content filtering accessible without needing to dig through Digital Wellbeing menus. It’ll integrate with Family Link, so the controls will feel less scattered than they do now.
Who this works best for: Parents. Specifically parents who want ongoing visibility, not just a one-time block. If you’re just trying to stop yourself from checking Reddit during work hours, this is overkill — look at Method 5 instead.
Method 3: Blocking Sites Within Specific Browsers
Sometimes system-wide blocking is more than you need. Maybe you just want to stop a specific distraction in the browser you actually use. Both Chrome and Firefox have options here — though they work pretty differently.
Google Chrome
This is something that Chrome does not allow you to do manually, you cannot block individual URLs. What it does provide, however, is Enhanced Safe Browsing, which helps to prevent dangerous downloads, phishing attacks and malware. How to enable: Chrome → Settings → Privacy and Security → Safe Browsing → Enable Enhanced protection.You cannot block a site manually in Chrome, it’s not a feature that it has. What it does provide is Enhanced Safe Browsing, which shields against pernicious downloads, phishing attempts and malware. To turn it on: Chrome → Settings → Privacy and Security → Safe Browsing → select Enhanced protection.
It’s not a site blocker in the traditional sense. Think of it more as a threat filter — useful, but won’t stop you from visiting a site you’ve consciously decided to visit. For actual URL blocking in Chrome, you’d need a third-party app running a VPN layer in the background (covered in Method 5).
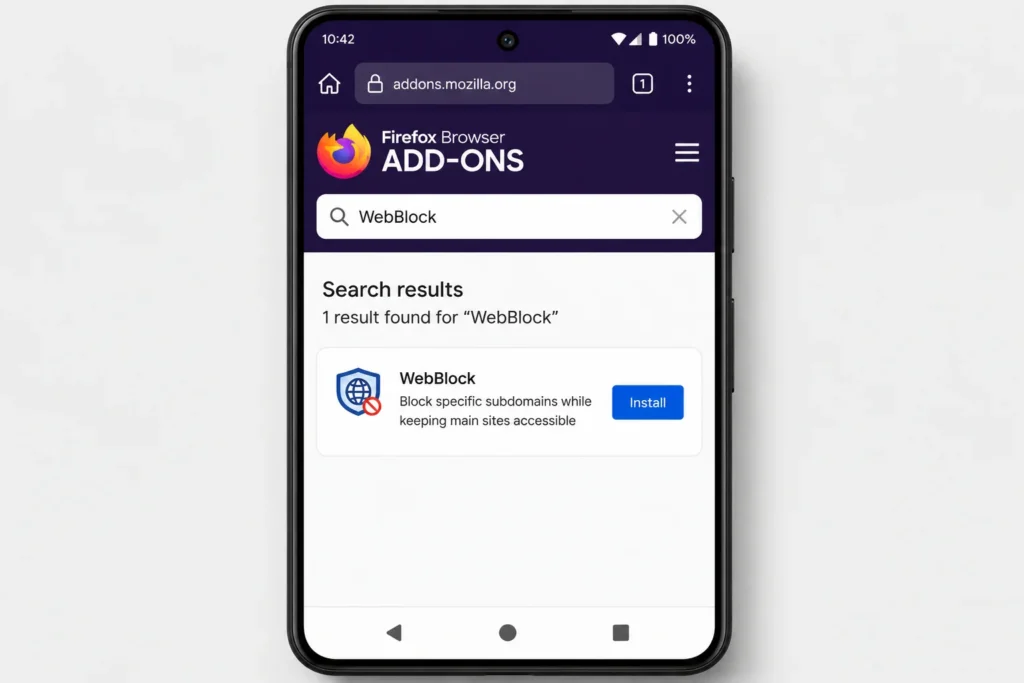
Firefox for Android
Firefox is a different story. It’s one of the only mobile browsers that supports extensions, which opens up some genuinely useful blocking options:
- VETO Firewall — blocks by country, domain or content category. Handy for broader filtering.
- WebBlock — lets you block specific subdomains. So you could block music.youtube.com without cutting off YouTube entirely. That’s a level of precision Chrome can’t touch.
- ZenGuard — less of a blocker, more of a focus tool. Combines site blocking with a Pomodoro timer, so it’s built around work sessions rather than permanent bans.
To install any of these: Firefox → tap the menu (three dots) → Add-ons → search by name.
Quick comparison — Chrome vs Firefox for blocking:
| Feature | Chrome | Firefox |
| Block specific URLs | ❌ Not natively | ✅ Via extensions |
| Block subdomains only | ❌ | ✅ WebBlock |
| Malware/phishing protection | ✅ Enhanced Safe Browsing | ✅ Built-in + extensions |
| Extension support | ❌ | ✅ |
| Best for | Threat protection | Granular site control |
If blocking specific sites in-browser matters to you, Firefox is the honest answer. Chrome is better at keeping you safe from threats you didn’t go looking for.
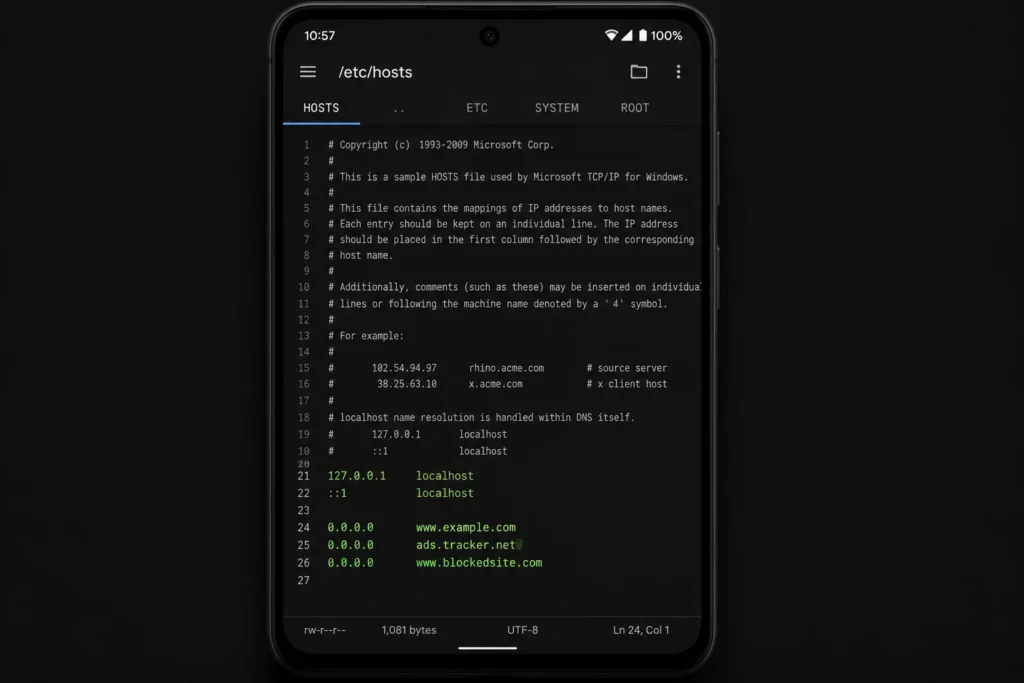
Method 4: Editing the Hosts File (Advanced Users Only)
This one’s not for everyone. If rooting your phone sounds unfamiliar or intimidating, skip ahead — Methods 1 or 5 will serve you better. But if you’re already running a rooted device with Magisk or KernelSU, hosts file editing is about as thorough as blocking gets.
The idea is simple. Your phone has a file at /etc/hosts that maps domain names to IP addresses before any DNS server even gets involved. Add a line like 0.0.0.0 www.blockedsite.com and the phone just refuses to route there — from any app, any browser, anything.
The old-school approach was editing that file manually with a root-enabled file manager. It works, but it’s messy and easy to break. The cleaner modern method is using BindHosts, a systemless hosts manager that hooks into Magisk or KernelSU. “Systemless” means it applies the block without permanently modifying system files — easier to update and less likely to trip up apps that check for root.
Honestly the main reason to go this route over Private DNS: you’re not dependent on a third-party DNS provider staying online and maintaining their blocklists. You control exactly what’s blocked, at the system level, with no external dependency.
The trade-off is obvious though — rooting voids warranties, can introduce security risks if done carelessly and isn’t reversible on every device. Worth knowing what you’re getting into.
Who this works best for: Developers, enthusiasts and anyone already running a rooted setup who wants precise, dependency-free control over what their device can reach.
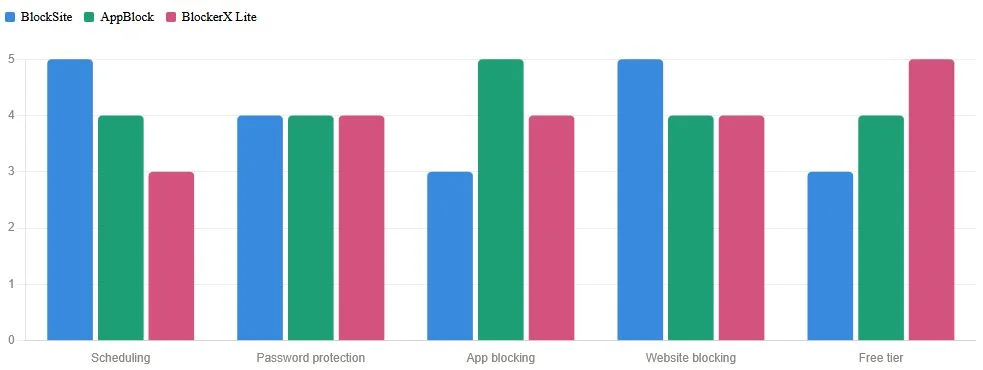
Method 5: Third-Party Blocker Apps
For most people — honestly — this is the sweet spot. Not as technical as hosts file editing, more flexible than Private DNS and purpose-built for the exact problem of “I need to stop visiting this site.”
Three worth knowing:
- BlockSite is the most popular option in this category. You add sites to a blocklist, set schedules (block social media 9am–5pm on weekdays, for instance) and it runs a local VPN in the background to enforce the rules across all browsers and apps. Password protection means you can’t just uninstall it in a weak moment. It’s free for basic use, paid for scheduling and sync features.
- AppBlock takes a slightly different angle — it’s profile-based. You create a “Work” profile or a “Study” profile, define which apps and sites are off-limits during that mode and switch between them. Good if your blocking needs vary throughout the day rather than being one static list.
- BlockerX Lite is worth a mention specifically for anyone trying to block adult content. It’s built around that use case, with stricter enforcement than general-purpose blockers and a community accountability feature if that kind of thing helps.
One thing all three have in common: they use Android’s VPN permission to intercept traffic. That’s how they achieve system-wide blocking without root access. It also means they can’t run simultaneously with an actual VPN — same limitation as Private DNS.
Who this works best for: Anyone who wants blocking that’s easy to set up, hard to circumvent and flexible enough to schedule around a real daily routine.
Method 6: Enterprise and MDM Solutions
Quick reference for those who might come here from a work environment. If you’re an IT admin owning a company’s Android devices, you don’t need to set up individual apps — you can use app blocklists and allowlists via Mobile Device Management (MDM) solutions such as Microsoft Intune, VMware Workspace ONE or Google’s own Android Enterprise and push them remotely to all devices in the organization from a single control point.
As the employees can’t remove the personal app, they cannot remove these restrictions. Policies are not applied at the app level, but at the time of enrollment. It is another type of solution but it is proper to mention it here because it is the right answer to this exact type of problem.
So Which Method Should You Actually Use?
Depends entirely on the problem you’re trying to solve.
| Your Situation | Best Method |
| Want system-wide filtering, no apps | Private DNS |
| Managing a child’s device | Google Family Link |
| Just need browser-level protection | Chrome Safe Browsing or Firefox extensions |
| Want scheduling + password protection | BlockSite or AppBlock |
| Rooted device, want full control | Hosts file editing |
| Managing company devices | MDM solution |
When in doubt, use Private DNS. Requires no additional time or resources and is applied across the entire device. If there is a need for scheduling or a more stringent lock, install a third party application on top. This combination works for the majority of real-world situations without over-entailing things.
Got a specific setup — like a Samsung device or a phone that a kid and parent share? Drop it in the comments and we’ll point you to the right combination.


